
If your Keurig isn’t brewing, it may be clogged with mineral deposits, debris, or blockages in the needle or brew path. First, check the water reservoir, filters, and clean the needle with a paperclip. Descale the machine using vinegar or descaling solution to remove buildup. Also, clean the pod holder and spray nozzle. Staying on top of these steps can keep your machine running smoothly—more tips await if you want to troubleshoot further.
Key Takeaways
- Check and clean the water reservoir, filter, and internal components for debris or mineral buildup.
- Descale the machine regularly using vinegar or descaling solution to remove mineral deposits blocking water flow.
- Clear any clogs in the brew needle, spray nozzle, and pod holder with a paperclip or small brush.
- Ensure the water reservoir has adequate water and that the pump is functioning properly.
- Perform routine maintenance, including cleaning the brew area, and replace filters if damaged or clogged.
Identifying Common Causes of a Clogged Keurig
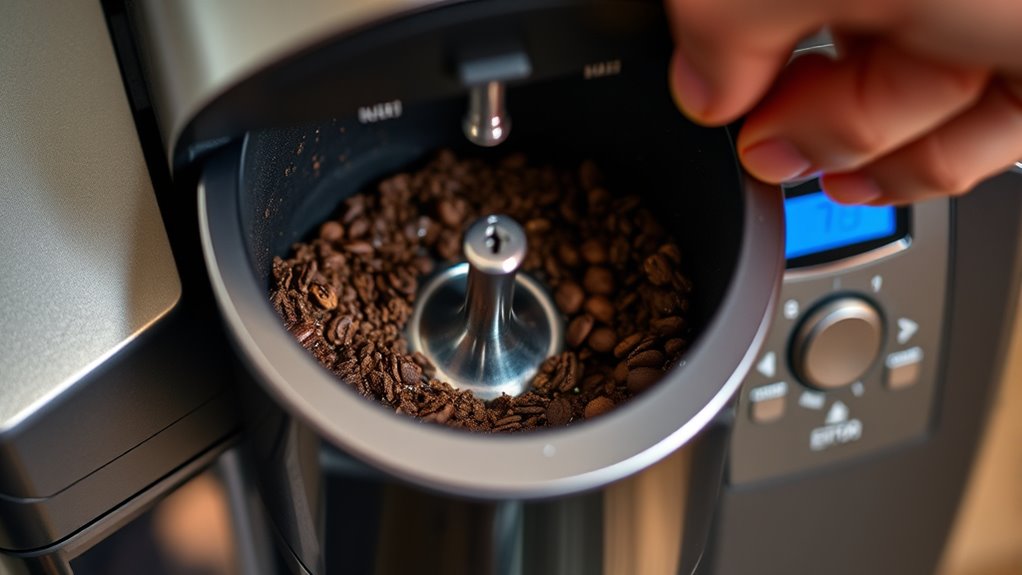
A clogged Keurig is often the result of mineral buildup, coffee grounds, or debris blocking the water flow. Water pressure plays a significant role; if mineral deposits accumulate inside the machine, they restrict water movement, reducing pressure and causing Clogs. Additionally, the age of your machine affects its performance—older models are more prone to buildup and internal wear, which can hinder water flow. When mineral deposits accumulate, they form blockages that prevent water from passing through the system efficiently. Over time, this leads to decreased water pressure and obstruction of the brewing path. If your Keurig is older, regular maintenance becomes even more critical to prevent these issues. Incorporating descaling procedures can help remove mineral buildup and restore proper water flow. Regular cleaning and maintenance can also prevent future clogs and prolong the lifespan of your coffee machine. Ensuring proper water quality by using filtered water can further reduce mineral deposits and improve your machine’s performance.
Checking the Water Reservoir and Filters
When your Keurig isn’t brewing properly, checking the water reservoir and filters is a good first step. Make sure the water level is adequate; a low water level can prevent brewing. Remove the reservoir and inspect it for any buildup or debris that could block water flow. Next, evaluate the filter condition—if your machine has a reusable filter, clean it thoroughly or replace it if it’s clogged or damaged. Use the following table to assess your filter:
| Water Level | Filter Condition | Action Needed |
|---|---|---|
| Low | Dirty or clogged | Refill or replace |
| Adequate | Clean | No action needed |
| Excessive | Damaged | Replace |
| Empty | N/A | Refill |
Ensuring proper water level and a clean filter helps maintain ideal brewing performance. Regular maintenance can also prevent clogged coffee machines and extend the life of your Keurig. Additionally, checking the water flow system for any obstructions can further improve brewing efficiency. Being aware of common clogging causes can help you troubleshoot issues more effectively. Regularly inspecting these components can help prevent blockages from forming inside your machine. Proper cleaning and inspection of internal parts like the water pathway are essential for optimal operation.
Inspecting and Cleaning the Needle and Brew Path
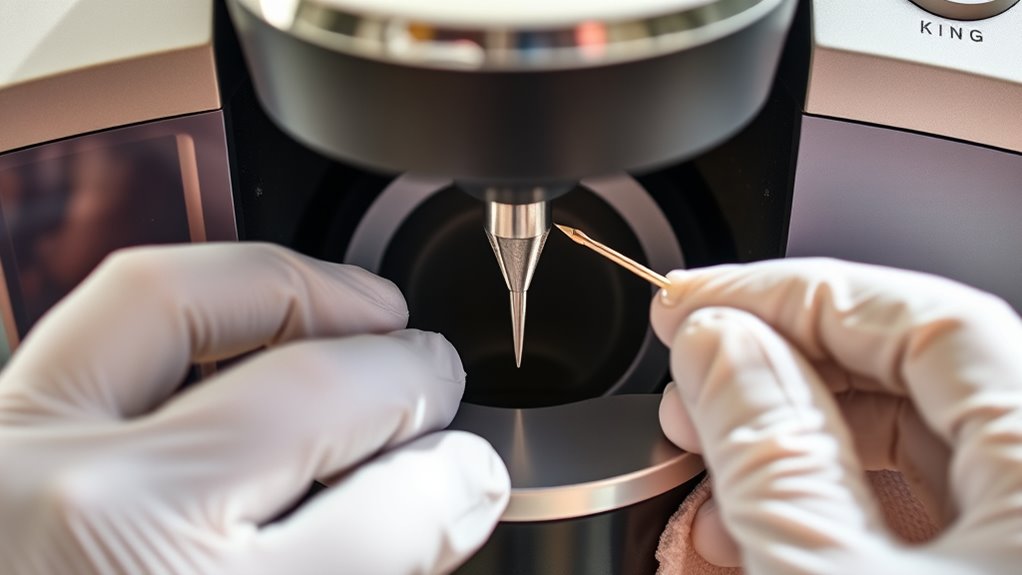
Inspecting and cleaning the needle and brew path is essential to guarantee your Keurig functions properly. Over time, mineral deposits, coffee grounds, or debris can clog the needle or obstruct the water flow, causing brewing issues. Start by unplugging your machine and removing the water reservoir. Carefully inspect the needle for any blockages or buildup—use a paperclip or a needle cleaning tool to clear out any obstructions. Also, examine the brew path for residue or clogs. Running a water cycle without a K-cup can help flush out any lingering debris. Regular needle inspection and cleaning ensure smooth water flow and prevent clogs that can lead to brewing problems. Keeping these parts clean helps your Keurig operate efficiently and brew fresh coffee every time. Additionally, preventive maintenance such as regular descaling can help reduce mineral buildup and keep your machine running smoothly. Properly maintaining your machine according to manufacturer guidelines can further extend its lifespan and performance. Incorporating descaling solutions into your routine can effectively remove mineral deposits that contribute to clogs and performance issues. Regularly checking the electric components can also prevent electrical malfunctions and ensure safe operation. Furthermore, paying attention to water quality can significantly impact the longevity and cleanliness of your coffee maker.
Descaling Your Keurig to Remove Mineral Buildup

Mineral buildup from hard water can considerably impair your Keurig’s performance, leading to slow brewing, weak coffee, or machine errors. To restore peak machine efficiency, it’s crucial to descale regularly. Start by filling the water reservoir with a descaling solution or a mixture of equal parts white vinegar and water. Run the brew cycle without a coffee pod until the reservoir is empty, then let the machine sit for 30 minutes to loosen deposits. Rinse thoroughly by running fresh water through multiple cycles. Descaling removes mineral deposits that can affect water flow, ensuring your coffee flavor remains rich and consistent. Regular descaling not only improves performance but also prolongs your Keurig’s lifespan, keeping your mornings smooth and your coffee tasting great. Incorporating smart maintenance routines can help monitor and alert you when descaling is needed, preventing clogs before they occur.
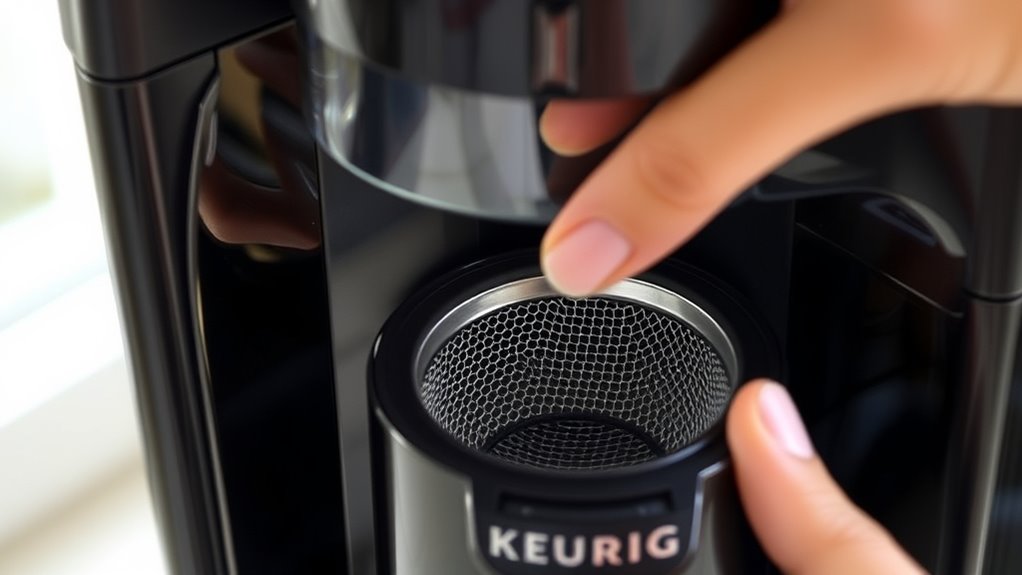
Clearing Blockages in the Coffee Pod Holder

To clear blockages in your Keurig’s coffee pod holder, start by removing the pod holder itself. Next, check and clean the spray nozzle if it’s clogged, and inspect for any debris or obstructions. Taking these steps guarantees proper water flow and helps your machine brew correctly again. Additionally, regularly maintaining your coffee machine with proper cleaning routines and connected equipment can prevent future blockages and ensure optimal performance. Proper water pressure is essential for consistent brewing, so verifying that your machine maintains the correct pressure can also improve results. Regularly inspecting the brew system components can help identify early signs of buildup and avoid more serious clogs.
Remove Coffee Pod Holder
If your Keurig isn’t brewing properly, a common cause is a blockage in the coffee pod holder. To fix this, start by removing the pod holder from your machine. Carefully lift it out, making sure to check for any stuck coffee grounds or debris. While doing this, confirm that your coffee pod compatibility matches the holder, as incompatible pods can cause jams. Also, take this opportunity to organize your pod storage solutions, ensuring pods aren’t forcing the holder to misalign. Once removed, rinse the pod holder under warm water to clear any blockages. Dry it thoroughly before reinserting. Clearing blockages here can improve water flow and prevent brewing issues caused by a clogged coffee pod holder. Additionally, inspecting the water flow system can help identify other potential causes of brewing problems. Regularly cleaning the internal components can help maintain optimal performance and prevent future clogs. Remember that proper maintenance is key to keeping your Keurig functioning smoothly over time. Performing periodic descaling can also reduce mineral buildup that might contribute to blockages and brewing issues. Incorporating routine cleaning practices ensures your machine remains free of mineral deposits and debris, enhancing its longevity.
Clean Blocked Spray Nozzle
When your Keurig isn’t brewing properly, a blocked spray nozzle could be the culprit. Over time, mineral deposits or coffee residue can cause a spray nozzle blockage, preventing water from flowing evenly. To fix this, start by unplugging your machine and removing the water reservoir. Use a needle or a small brush to gently clear out any debris from the nozzle opening. You can also try nozzle cleaning techniques like soaking it in vinegar or running a descaling solution through the machine. Be sure to rinse thoroughly afterward. Regularly cleaning the spray nozzle ensures proper water flow and prevents future clogs. Taking these steps helps keep your Keurig functioning smoothly and guarantees a better brew every time. Additionally, understanding the importance of air quality can help maintain a healthier environment around your appliance and reduce buildup caused by airborne particles.
Check for Debris Obstructions
Have debris or leftover coffee grounds ever blocked the coffee pod holder, preventing your Keurig from brewing properly? Debris can cause drainage issues, leading to water not flowing correctly through the machine. Remove the pod holder and inspect for any stuck particles or buildup. Clear out any debris using a soft brush or cloth, ensuring no obstructions remain. Sometimes, a clogged pod holder can be mistaken for power supply issues, but checking for physical blockages is essential first. Make sure the pod holder is seated correctly after cleaning. Also, verify that the machine is plugged in securely and the power supply is functioning. Clearing debris obstructions can restore proper drainage and airflow, helping your Keurig brew smoothly again.
Preventative Tips to Avoid Future Clogs

To keep your Keurig running smoothly, make sure you descal your machine regularly. Use filtered water to reduce mineral buildup and prevent clogs. Also, clean the brew area often to keep everything functioning properly.
Regular Descaling Routines
Regularly descaling your Keurig is essential to prevent clogs and guarantee smooth operation. By removing mineral buildup, you ensure that water flows freely, which directly impacts your coffee flavor—stale, bitter taste results from clogs or scale. Incorporate a descaling routine every three to six months, depending on your water hardness, to extend your machine’s lifespan. When you descale regularly, you reduce the risk of blockages that cause brewing issues. This simple maintenance step keeps internal components clean and functioning efficiently. Ultimately, a well-maintained Keurig brews better-tasting coffee and lasts longer, saving you money on repairs or replacements. Consistent descaling is a proactive way to keep your machine reliable and your coffee consistently delicious.
Use Filtered Water Only
Using filtered water can considerably reduce mineral deposits inside your Keurig, helping prevent future clogs. When you use filtered water, you improve water quality, which minimizes the buildup of scale and minerals that often cause blockages. Tap water contains minerals like calcium and magnesium that can accumulate over time, especially in hard water areas. These deposits can restrict water flow and lead to brewing issues. By switching to filtered water, you reduce the likelihood of mineral buildup, keeping your machine cleaner and functioning smoothly for longer. It’s a simple preventative step that can save you time and effort in regular maintenance. Consistently using high-quality filtered water helps maintain ideal performance and prolongs the lifespan of your Keurig.
Clean Brew Area Frequently
Cleaning the brew area often is one of the most effective ways to prevent future clogs in your Keurig. When you regularly clean, you remove mineral buildup and coffee residue that can block water flow. Ensuring the brewing temperature stays consistent helps prevent the machine from overworking to reach the right heat, which can affect water pressure. Proper water pressure is essential for a smooth brew; if it’s too low, your coffee may not dispense correctly, increasing the risk of clogs. Regularly wiping down the brew area, including the needle and surrounding components, keeps everything clear and functioning ideally. By maintaining a clean brew area, you support steady brewing temperature and water pressure, which together reduce the likelihood of blockages and keep your Keurig brewing smoothly.
When to Seek Professional Repair or Replacement

If your Keurig refuses to brew despite troubleshooting efforts, it may be time to contemplate professional repair or machine replacement. Persistent issues like failure to power on, leaking, or error messages that don’t clear suggest deeper problems beyond DIY fixes. Attempting to fix complex internal components yourself can sometimes cause more damage. In these cases, professional repair is your best option to diagnose and safely address hardware issues. If repairs cost too much or the machine is outdated, replacing it might be more practical. Consider the age and condition of your Keurig—if it’s old or frequently breaking down, a new machine could save you time and frustration. Knowing when to seek expert help ensures your coffee routine stays smooth and avoids unnecessary expenses.
Frequently Asked Questions
Can Using Different Coffee Pod Sizes Cause Clogging Issues?
Using different coffee pod sizes can cause clogging issues because not all pods are compatible with your Keurig machine. When you use incompatible pods, they may not fit properly, disrupting brewing speed and causing blockages. Always check coffee pod compatibility before brewing. This guarantees smooth operation, prevents clogs, and maintains ideal brewing speed, so you get your coffee quickly and without hassle.
How Often Should I Descale My Keurig for Optimal Performance?
You should descale your Keurig every three to six months for ideal maintenance. Regular descaling prevents mineral buildup that can cause clogs and reduces brewing performance. If you notice slower flow or inconsistent brewing, it’s a sign you need to descale sooner. Using a descaling solution or vinegar, follow your machine’s instructions to keep it running smoothly. Staying consistent with descaling helps extend your Keurig’s lifespan and ensures great-tasting coffee every time.
Will Hard Water Damage My Keurig Over Time?
Yes, hard water can damage your Keurig over time due to mineral buildup. Water hardness causes minerals like calcium and magnesium to accumulate inside the machine, which can clog the water lines and affect performance. To prevent this, use filtered or descaled water regularly, and descale your Keurig as recommended. This helps reduce mineral buildup and keeps your coffee machine working smoothly longer.
Are There Eco-Friendly Cleaning Solutions for Keurig Maintenance?
Yes, you can use eco-friendly cleaning solutions for your Keurig. While some see biodegradable cleaners as gentle, they’re powerful enough for natural descaling, protecting your machine and the environment. Unlike harsh chemicals, these solutions break down safely after use, preventing harmful build-up and reducing ecological impact. By choosing biodegradable cleaners, you’re embracing sustainability and extending your Keurig’s lifespan, making each brew both eco-conscious and enjoyable.
What Signs Indicate My Keurig Needs Professional Repair?
If your Keurig leaks water or makes strange noises, it’s time to seek professional repair. Leaking water can signal internal damage or worn-out seals, while strange noises often indicate motor or pump issues. Don’t ignore these signs, as they can worsen or damage your machine further. Contact a qualified technician promptly to diagnose and fix the problem, ensuring your Keurig works efficiently and safely again.
Conclusion
By following these steps, you can breathe new life into your Keurig and keep it running smoothly. Think of it as giving your coffee maker a gentle tune-up, ensuring it’s always ready to brew your favorite cup. With a little care and regular maintenance, you’ll prevent clogs from sneaking up on you again. Soon, your Keurig will be as reliable as a trusted friend, making perfect coffee just when you need it most.