
TL;DR
Moving your rig into a closet or another room is the most effective way to silence it. Proper placement and ventilation are key—foam and treatment alone won’t cut it. This guide shows how to make a small space both quiet and cool.
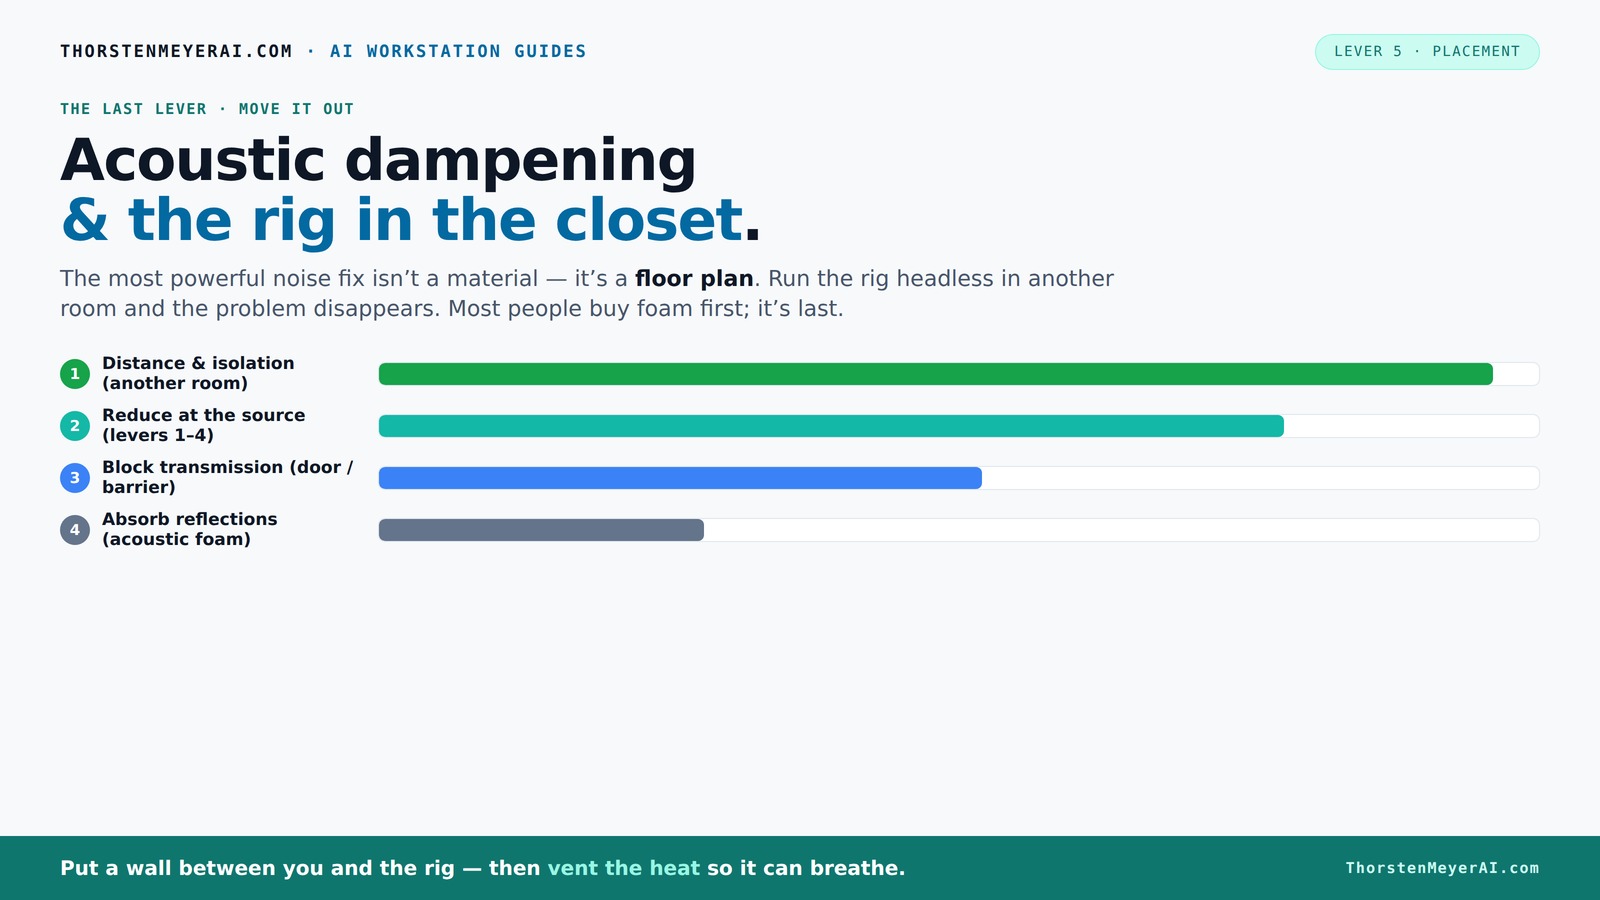
Acoustic dampening
& the rig in the closet.
The most powerful noise fix isn’t a material — it’s a floor plan. A rig you can’t hear because it’s in another room beats any amount of foam. Tap the approaches in Part 1 to see what actually works.
(another room)
(levers 1–4)
(door / barrier)
(acoustic foam)
Contain the noise, not the heat
Key Takeaways
- Moving your rig into another room or closet is the most effective noise control method.
- Proper ventilation is essential when placing a high-heat rig in a sealed space like a closet.
- Start with mic placement before adding acoustic treatment; reflection points matter most. To learn more about optimizing your microphone setup, visit bestofculinary.com.
- Cover large surfaces with soft, thick materials to reduce echo and low-frequency buildup.
- Seal gaps around doors and hard surfaces to prevent sound leakage and improve overall quietness.
soundproof closet for audio rigs
As an affiliate, we earn on qualifying purchases.
As an affiliate, we earn on qualifying purchases.
Why Distance Is Your Best Friend for Noise Control
Moving your rig away from your ears beats any foam panel. When you put physical distance between yourself and the noise source, sound waves weaken significantly due to the inverse square law — essentially, sound intensity diminishes with the square of the distance. This means doubling the distance reduces perceived loudness by about 75%. Think of it like shouting across a field — the farther away you are, the less you hear.
Imagine having a GPU rig in another room, connected via fast Ethernet. You can control it remotely, and it’s almost like it’s not there. This setup not only reduces noise but also minimizes heat buildup and vibration transfer, which can affect your workspace’s comfort and equipment longevity. For more on managing heat and noise, see cooling and ventilation techniques. Distance also helps prevent the transfer of mechanical vibrations that can subtly rattle nearby surfaces, adding to ambient noise.
According to recent insights, distance and isolation top the list of effective noise reduction strategies. It’s cost-effective, requires no additional materials, and can be implemented quickly. However, it does require a bit of planning — ensuring your setup remains accessible and functional from afar, which sometimes involves remote management solutions.

54 Pack Sound Proof Foam Panels |12"×12"×1" Quick-Recovery Soundproof Wall Panels | High Density Sound Dampening Panels for Home Studio |With Adhesive Stickers 270PCS
Superior Acoustic Treatment: These sound-absorbing foam panels effectively dampen echoes and reverberations for enhanced audio clarity and quality
As an affiliate, we earn on qualifying purchases.
As an affiliate, we earn on qualifying purchases.
The 'Rig in the Closet' Setup — Why It Works and What to Watch Out For
Placing your noisy, heat-generating machine inside a closet sounds perfect — and it is, if you do it right. It isolates sound by surrounding the rig with dense materials, preventing sound waves from escaping into your main workspace. This is especially effective in small spaces where open setups would cause echo and noise leakage. But there’s a critical tradeoff: heat.
A sealed closet traps heat from high-performance components like GPUs and CPUs, which can quickly elevate temperatures beyond safe operational limits. This not only risks hardware damage but also causes thermal throttling — where the system reduces performance to cool down — and increases fan noise as fans spin faster to dissipate heat. These effects can negate the benefits of soundproofing if not managed properly.
To make this work, proper ventilation is essential. Installing a quiet, high-quality exhaust fan, adding intake vents, or ducting cool air in and hot air out ensures the interior remains within safe temperature ranges. Layering acoustic blankets with ventilation ducts can create a soundproof chamber that stays cool while keeping noise outside. For detailed methods, check out the rig in the closet setup guide. Achieving the right balance between sound isolation and heat dissipation is a nuanced process — it requires testing and adjusting ventilation configurations based on your specific hardware and room conditions.
For detailed methods, check out the [how-to guide on cooling and ventilation](https://thorstenmeyerai.com/reduce-heat-noise-ai-workstation/) — it’s the secret to a happy, silent rig in a small space. Remember, the goal is to isolate sound without sacrificing hardware performance or longevity.

be quiet! Silent Base 802 Window ATX Midi Tower PC Case| 3 Pre-Installed Pure Wings 2 Fans | Sound Insulated | Tempered Glass Window | Black | BGW39
Interchangeable top cover and front panel for either maximum airflow or silent operation
As an affiliate, we earn on qualifying purchases.
As an affiliate, we earn on qualifying purchases.
Placement First: Where to Put Your Microphone and How That Changes Everything
Before you treat a room, decide where your microphone will sit. Placement is the most important step in capturing clear, natural sound because it directly influences how much of the room’s reflections and ambient noise are captured. Position your mic at the primary reflection point — roughly where your mouth will be — which minimizes the capture of reflected sound and reduces the need for extensive treatment. For more on microphone placement, see bestofculinary.com. Avoid hard surfaces directly behind or beside you, as they bounce sound directly into the mic, causing echo and coloration.
In a small closet, close-miking is a practical approach to reduce room sound, but the mic’s position remains crucial. Slight adjustments—such as moving the mic 2-4 inches off-axis or angling it toward a soft surface—can significantly reduce unwanted reflections and flutter echo. This is because the direct sound from your voice becomes dominant over reflected sound, resulting in a clearer recording.
Testing different positions—by recording short clips and listening critically—helps identify the sweet spot. Remember, the goal is to prioritize placement over treatment: a well-placed mic can often reduce the need for excessive acoustic treatment, saving time and resources while improving clarity.

VEVOR Portable Vocal Booth, 6.56 ft Height, Portable Recording Studio with Travel Bag, Mobile Tablet Stand, Thickened Soundproofing, Sound Isolation Booth for Echo-Free Vocals, Podcasts, Voiceovers
Say Goodbye to Echoes: Built with durable Oxford cloth and acoustic padding, this recording booth for the home...
As an affiliate, we earn on qualifying purchases.
As an affiliate, we earn on qualifying purchases.
Where to Treat Your Closet: The Most Important Spots
Start with the reflection points: the wall behind your mic, the ceiling directly above, and the side walls near your position. Cover these with foam, blankets, or DIY panels. These surfaces bounce sound back and forth, creating that echoey, boxy tone characteristic of untreated small spaces. Targeting reflection points reduces early reflections that cause muddiness and obscurities in your recordings.
Corners are low-frequency trouble spots because bass energy tends to accumulate there, leading to boomy, muddy sounds. For tips on bass trapping, visit lacocoon.com. Installing bass traps or thicker panels in these areas can absorb low-end buildup, preventing it from overwhelming your mix. However, coverage is more critical than perfect placement; layering soft materials over large areas—like walls and ceiling—provides broader damping and a more natural sound.
Imagine a streamer lining the back wall with blankets, covering the ceiling with acoustic foam, and adding a rug on the floor. These simple, effective strategies greatly reduce reflections and low-frequency issues, transforming a reflective, echo-prone closet into a focused vocal and recording environment. The key is understanding that comprehensive coverage, even with imperfect placement, yields better results than spot-treatments alone.
Sealing the Weak Points: Door Gaps and Hard Surfaces
Your door is the weakest link in soundproofing. Gaps around hinges, weatherstripping, or unsealed edges allow sound to leak out, reducing the effectiveness of your treatment. Sealing these gaps with acoustic caulk, draft stoppers, or weatherstripping creates an airtight barrier that significantly reduces noise escape and prevents sound from leaking into adjacent rooms.
Hard surfaces like the door itself, the floor, and any unsoftened walls reflect sound waves, increasing reverberation and echo inside your space. Adding a thick rug, moving blankets, or acoustic panels over these surfaces absorbs some of the reflections, creating a more controlled environment. Sealing cracks and installing draft blockers not only reduces noise leakage but also improves overall acoustic containment, making your treatment more effective.
For example, a YouTuber sealed his closet door with weatherstripping and hung a blanket, which cut his noise leakage by approximately 70%. Such small modifications are cost-effective and surprisingly impactful, especially in confined spaces where every decibel counts.
How Much Coverage Do You Really Need? The DIY Approach
When treating a tiny closet, coverage often matters more than perfect placement. Covering large reflective surfaces—walls, ceiling, and floor—with foam panels, blankets, or DIY absorbers creates a broad damping effect that reduces overall echo and flutter. Think of this as wrapping the space in a soft blanket—broad coverage dampens multiple reflections and makes the room sound more natural.
Research and experience show that covering about 50-70% of reflective surfaces yields noticeable improvements. Thicker panels—2-4 inches—are more effective at absorbing low frequencies and preventing boomy sounds, especially in larger or more reflective spaces. Prioritize covering surfaces that face your mic or directly reflect sound back toward it.
For example, a DIY enthusiast used moving blankets on walls, a foam ceiling panel, and a rug on the floor. The result was a significant reduction in echo, clearer vocals, and a tighter, more professional sound. The key is balancing coverage with material thickness, ensuring enough damping without over-damping the space.
The Final Step: Test and Tweak Your Setup
Once your setup is in place, recording a test is essential. Listen critically for lingering echoes, boomy lows, or muffled sounds. Use headphones or monitors to identify problem areas. Adjust placement—try moving the mic slightly or repositioning your treatment materials—and add more treatment or seal gaps if necessary. Small tweaks can lead to substantial improvements in sound quality, clarity, and noise isolation.
Iterative testing and tweaking are crucial—small changes like shifting the mic a few inches, adding a blanket, or sealing a crack can transform muddy recordings into professional-quality audio. Keep in mind that in small spaces, acoustic conditions can change quickly with minor adjustments, so patience and experimentation are key.
Consistently evaluate your setup by recording, listening, and adjusting until your voice sounds natural, clear, and free of unwanted reverberation. This ongoing process ensures your space remains optimized for the best possible sound.