
If you’re looking for the best central vacuum kits you can install yourself, I recommend the OVO Central Vacuum Installation Kit with 48 ft of pipe, the universal low voltage kits with 130′ or 80′ of piping, which come with clear instructions and all components you’ll need. These kits are designed for DIYers, offering compatibility, ease of installation, and expansion options. Stay with me to discover more about choosing the perfect system for your home.
Key Takeaways
- Look for kits with clear instructions, pre-cut components, and all necessary hardware for straightforward DIY installation.
- Ensure compatibility with your existing piping diameter (usually 2-inch) and electrical system requirements.
- Choose durable, high-quality PVC or metal pipes resistant to corrosion, cracking, and UV exposure for long-term reliability.
- Select kits that include expansion options, extra fittings, and modular components for future system upgrades.
- Opt for user-friendly features like organized wiring, secure fittings, and comprehensive manuals to simplify installation and troubleshooting.
OVO Central Vacuum Installation Kit with 48 ft Pipe and Fittings
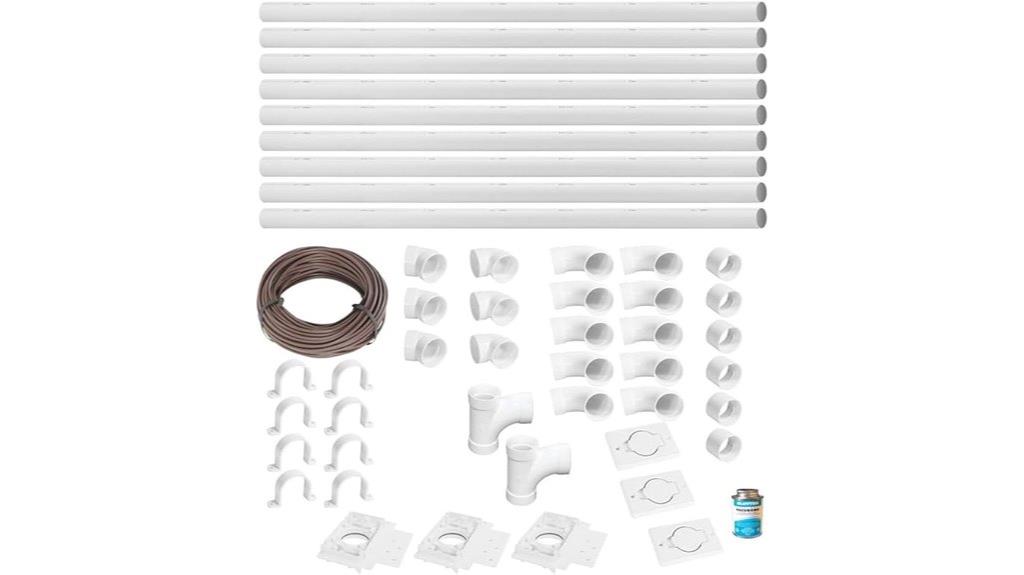
If you’re looking for a versatile and reliable central vacuum installation kit, the OVO Central Vacuum Installation Kit with 48 ft of pipe and fittings is an excellent choice. It includes everything you need for a smooth setup, like 48 feet of durable PVC pipe, multiple elbows, and stop couplings. The kit features three round door-style inlets and brackets, making installation straightforward. It’s compatible with all systems using 2-inch pipes and works well with low-voltage wiring, thanks to the included 50 feet of electrical wire. Overall, it’s a thorough, user-friendly kit perfect for DIYers seeking a dependable solution.
Best For: DIY homeowners and contractors seeking a comprehensive, compatible central vacuum installation kit for easy setup and reliable performance.
Pros:
- Includes all essential components such as 48 ft of durable PVC pipe, elbows, stop couplings, and brackets for a complete installation.
- Compatible with any central vacuum system using 2-inch pipes, ensuring versatile use.
- Comes with 50 feet of electrical wire, making low-voltage wiring straightforward and efficient.
Cons:
- May require additional tools or accessories not included in the kit for full installation.
- Designed specifically for 2-inch pipe systems, limiting compatibility with smaller or larger piping.
- The kit’s size and components might be overwhelming for very small or simple vacuum installations.
Universal Low Voltage Installation Kit (5), 130′ of Pipe
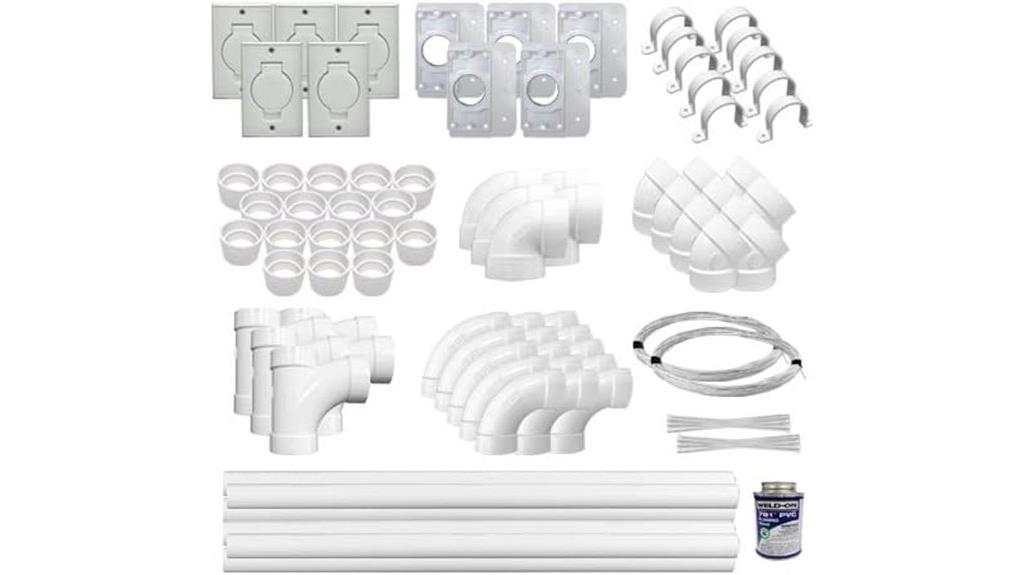
The Universal Low Voltage Installation Kit (5), 130′ of Pipe, is an ideal choice for homeowners or professionals seeking a versatile and straightforward solution for central vacuum system setup. It includes all necessary components, such as 130 feet of pipe in 5-foot sections, 130 feet of wiring, universal Hayden 1500 style inlets, and an easy-to-follow manual. The kit’s compatibility with most vacuum models and its multiple inlet options make it adaptable to various layouts. Designed for simple installation, it features fittings, brackets, and accessories like couplings and pipe straps, ensuring a hassle-free setup and reliable operation.
Best For: homeowners and professionals seeking a versatile, easy-to-install central vacuum system setup compatible with most models.
Pros:
- Includes all necessary components for a complete installation, simplifying setup
- Compatible with most central vacuum makes and models for broad applicability
- Features multiple inlet options and accessories for flexible system configuration
Cons:
- Might be overkill for small or simple vacuum system needs
- Installation may require basic plumbing or wiring skills for optimal setup
- Limited to 130 feet of pipe; larger projects may need additional materials
Universal Low Voltage Installation Kit (3), 80 ft. of Pipe
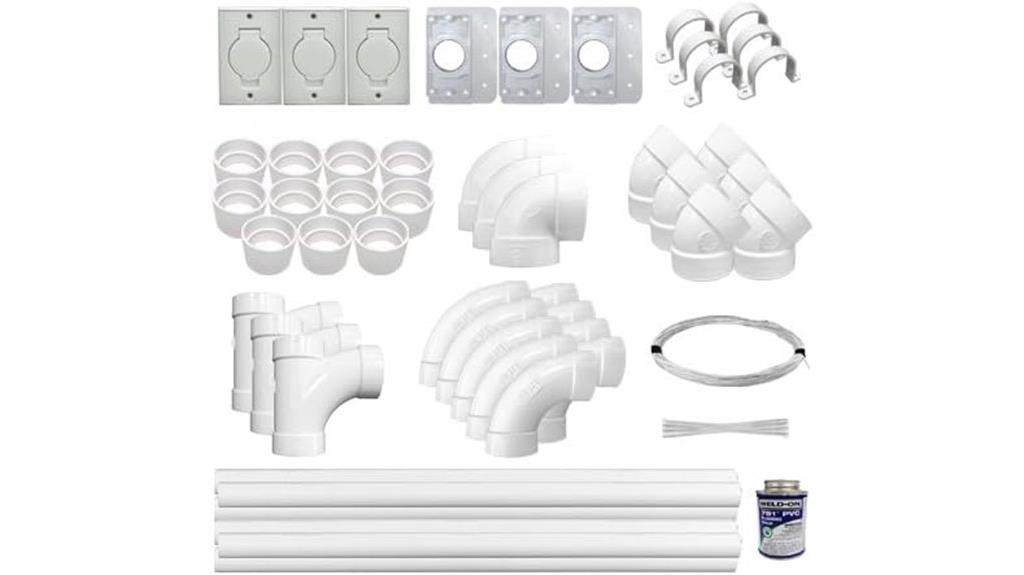
The Universal Low Voltage Installation Kit (3), with 80 feet of pipe, offers a versatile solution for installing central vacuum systems, making it an excellent choice for homeowners or contractors seeking compatibility across most makes and models. It includes all necessary components, such as fittings, couplings, mounting brackets, and pipe sections, simplifying the installation process. The kit features Hayden 1500 style low voltage inlets, ensuring broad system compatibility. With extensive materials and an easy-to-follow manual, it streamlines DIY setup, saving time and effort. Whether upgrading or installing a new system, this kit provides the flexibility and reliability needed for a professional-quality central vacuum.
Best For: homeowners and contractors seeking a comprehensive, compatible, and easy-to-install central vacuum system solution.
Pros:
- Includes all necessary components for a complete installation, simplifying setup
- Compatible with most makes and models, offering versatile use
- Comes with an installation manual, making DIY installation straightforward
Cons:
- May require some basic plumbing or electrical knowledge for optimal installation
- The kit’s length of pipe (80 ft.) may be excessive for small spaces
- Limited to low voltage system compatibility, not suitable for high voltage applications
Factors to Consider When Choosing Central Vacuum Kits for DIY Installation
When choosing a central vacuum kit for DIY installation, I consider factors like compatibility with my system type and the pipe length needed for my space. It’s also important to look at fitting options, accessories, and how easy the kit is to install myself. Finally, I check what electrical components are required to guarantee a smooth setup.
Compatibility With System Type
Choosing a central vacuum kit that matches your existing system is crucial for smooth installation and reliable performance. First, check that the kit’s pipe diameter aligns with your current piping, usually 2 inches outer diameter. Make sure the electrical components, like voltage and wiring, are compatible with your system to avoid issues. Verify that the inlet styles included suit your preferred installation locations. Additionally, ensure the fittings and elbows are compatible with your piping material, whether PVC or metal. Finally, review the kit’s overall compatibility with your vacuum system’s make and model. This ensures seamless integration, ideal operation, and minimizes the need for modifications or additional parts. Taking these steps helps guarantee your DIY installation is straightforward and long-lasting.
Pipe Length Requirements
To guarantee your central vacuum system works efficiently, you need to carefully determine the right pipe length based on your space. Start by measuring the total floor area to estimate the necessary pipe length for effective coverage. It’s important to consider the maximum distance between the vacuum unit and each inlet, ensuring the pipe accommodates all installation points without sacrificing suction. Plan for future expansion by leaving extra pipe length for additional inlets or modifications. Aim to minimize fittings, as they can create leak points and reduce performance. Always verify that your chosen pipe length aligns with your vacuum system’s specifications to maintain ideal efficiency. Proper planning now ensures a smooth installation and reliable operation for years to come.
Fitting and Accessory Options
Selecting the right fittings and accessories is key to customizing your central vacuum system for smooth operation and easy maintenance. Different fittings like elbows, tees, and couplings help you tailor the layout and navigate around obstacles efficiently. Using accessories such as stop couplings and pipe straps guarantees secure connections and stabilizes the piping. Compatibility with pipe diameters, typically 2 inches, is essential to avoid installation issues. A variety of elbow angles, including 45° and 90°, offer flexible routing and reduce airflow restrictions caused by sharp bends. Additionally, choosing inlet options and compatible fittings influences system accessibility and ease of maintenance. Proper fittings and accessories not only improve airflow but also simplify installation and future troubleshooting, making your DIY project more successful and long-lasting.
Ease of Installation
When installing a central vacuum system yourself, ease of installation depends heavily on the kit’s design and included components. I look for kits with clear, detailed instructions to guide me through each step, reducing guesswork. Pre-cut pipe sections and fittings are a huge plus since they save time and effort by minimizing cutting and adjustments. It’s also helpful if the kit provides all necessary mounting hardware and brackets, making the assembly straightforward and secure. Compatibility matters too—fittings and components should match my existing or planned system. Finally, labeled or color-coded pipes and fittings make identifying connections easier, which speeds up installation and minimizes mistakes. Overall, these features make DIY installation more manageable and less stressful.
Electrical Components Needed
Choosing the right electrical components is key to guaranteeing your central vacuum system works smoothly and safely. Make sure the kit includes appropriate low-voltage wiring, usually 24V, for system communication and activation. Check that the wire gauge and length match your home’s layout to avoid voltage drops and guarantee safety. Compatibility is vital—verify that all electrical components work with your system’s power requirements and control modules. It’s also important to have connectors, terminals, and wire ties included for secure, organized connections. Consider whether the kit provides enough wiring for your planned number of inlets and distances between them. Proper electrical components prevent issues down the line and help you achieve a reliable, efficient installation.
Material Durability
Durability is a crucial factor when picking a central vacuum kit for DIY installation, as it determines how well the system withstands everyday use and environmental conditions. High-quality PVC or metal pipes are essential because they resist cracking, warping, and corrosion over time. The strength of fittings and elbows also matters; reinforced materials better withstand wear and accidental impacts. If you plan to install the system outdoors or in sunlight, opt for UV-resistant components to prevent deterioration. The pipe thickness and wall density play a big role—thicker-walled pipes offer greater resistance to pressure and mechanical damage. Additionally, look for kits manufactured to high standards and certifications, as these often indicate more durable, long-lasting components that will serve you well over the years.
Budget Constraints
Budget constraints play a significant role in selecting the right central vacuum kit for DIY installation. I recommend setting a clear overall budget that includes not just the kit itself but also installation costs and future maintenance. Comparing different kits helps find options with essential features within your financial limits. Keep in mind, cheaper kits may lack accessories or power, while slightly more expensive options often offer better value and durability. Don’t forget additional expenses like wiring, fittings, and tools needed for installation. Sometimes, investing a bit more upfront in a higher-quality kit can save money long-term by reducing repairs or replacements. Balancing your budget with quality helps you get a reliable system that fits your financial situation without sacrificing performance.
Expansion Potential
When selecting a central vacuum kit for DIY installation, it’s important to take into account its expansion potential to accommodate future needs. You should check if the kit includes extra pipe sections or fittings, making it easier to extend your system later on. Verify that the wiring and electrical components support adding new inlets or outlets without extensive rewiring. Compatibility is key—confirm that your existing setup can seamlessly integrate additional piping or fittings. Look for modular components that can be easily connected or extended as your cleaning needs grow. Also, review the manufacturer’s guidelines on maximum pipe length and the number of inlets allowed. This helps ensure your system can handle future upgrades without significant modifications or costs.
Frequently Asked Questions
Can I Install a Central Vacuum Kit in a Multi-Story Home?
Yes, you can install a central vacuum kit in a multi-story home. I’ve done it myself, and it’s totally manageable with some planning. You’ll need to run piping through walls and ceilings on each floor, and decide on the best power unit location. Just take your time, follow the instructions carefully, and you’ll have a convenient, efficient vacuum system that works seamlessly across all levels of your home.
What Tools Are Necessary for DIY Central Vacuum Installation?
Think of installing a central vacuum as assembling a puzzle—you’re connecting the pieces to create a seamless cleaning system. You’ll need basic tools like a drill, screwdriver, level, utility knife, and a stud finder. A measuring tape helps guarantee proper placement, and some extra wiring tools might be handy if you’re running power. With these tools in hand, I found the project manageable and even enjoyable, like building something from scratch.
How Long Does a Typical Central Vacuum Installation Take?
Installation usually takes me about 4 to 8 hours, depending on the size of the space and complexity. If I prep everything beforehand, like planning the route and gathering tools, it goes smoothly. I prefer doing it over a weekend, so I can take my time without rushing. Breaking it into sections helps, and I always recommend patience to guarantee everything’s installed properly and safely.
Is Electrical Wiring Required for Low Voltage Kits?
No, electrical wiring isn’t needed for low voltage kits, and honestly, it’s a game-changer! You won’t have to deal with dangerous electrical work or worry about tripping breakers. These kits run on simple low-voltage wiring, making installation super safe and straightforward. I love how quick and hassle-free it is—it’s like magic, transforming your space without any complicated wiring nightmares. DIY couldn’t be easier!
Are There Specific Wall or Floor Types Compatible With These Kits?
Yes, there are certain wall and floor types that work best with these kits. I’ve found that smooth, solid surfaces like drywall and concrete are ideal for installing vacuum tubing and outlets. Carpeted floors can be a bit tricky but still manageable with the right tools and techniques. I always recommend checking the kit’s specifications and consulting installation guides to guarantee compatibility with your specific wall and floor types.
Conclusion
Imagine yourself effortlessly weaving pipes through your walls, turning your home into a quiet, clutter-free haven. With the right central vacuum kit, you’re the architect of a cleaner space, guiding hoses along seamless routes. Whether it’s the sturdy 48 ft pipe or the flexible 130 ft setup, you’re in control. So, pick the kit that fits your home, and enjoy the satisfaction of installing a system that quietly works in the background, making your home shine.